About The Project

Tuesday, September 5, 2017

Friday, September 1, 2017


Thursday, August 31, 2017
Collected Data
- Two years of work
- There are approximately 380 pieces of glass in each panel
- It averaged about 1 ½ hours per piece of glass; around 30 hours of work a week
- Approximately two months of strictly design time was needed
- 10 rolls of solder (one pound each) were used
- Three rolls of copper foil – 425 inches per roll were needed
- Final cleaning: eight plus hours per panel

Wednesday, August 23, 2017
Almost There!
These four panels are calling on all the skills and knowledge
about stained glass construction that I have learned since I first started
working in glass in the 1960’s. In
addition, these panels are requiring many new approaches with new
solutions. Because the Heisey glass is
not flat but actually three dimensional, there is the challenge of fitting the
pieces together while maintaining the design and having the entire panel fit
within the required depth dimension allowed so that the panels may be sealed
between two layers of plate glass for installation in the new doors.
One goal for these panels has been to use glass from the
Museum that was broken or damaged. Many
pieces have chips, cracks, major scratches – all of which turn them into
“scrap” glass. For my purposes, a great deal of this glass can be re-purposed
through careful cutting and grinding into quite useable pieces for the
panels. Often times a third of a plate
will clear the imposed depth while the full piece will not, it is too deep to
fit. The base of a goblet can become a
roundel and slices of a goblet’s bowl and be flat enough if properly trimmed.
The internal strengthening created using zinc calming
(caming) as an integral part of the overall design also defines the internal
sections, helping to control the fitting of the glass into the overall allotted
depth.
Having completed the upper two panels to the point where they
can be put upright for a full visual inspection, two things are immediately
apparent. These panels are very sturdy –
the internal barring is quite strong and the glass itself (much of it is
amazingly thick) adds strength. The
second thing is that the high quality of Heisey glass – its shear clarity and
sparkle – makes these panels impressive.
They seem to glow.
Another area of discovery is working out the adjustments to
each piece so that the pieces may be soldered together after they have been
foiled in the Tiffany style. Some of the
individual pieces require over an hour of special grinding to get the proper
fit. In most cases, variations in the
three dimensional geometry allows for a good fit through physical contact. Occasionally there are larger gaps to
bridge. Since the panels are enclosed,
some of those gaps can be left open, accent the three-dimensionality of the
panels. However, all this non-flat
surfacing will make the final cleanings of the panels quite an
undertaking. This too, will be an
adventure.
I have taken great care to include as many of the various
patterns, etchings and colors of Heisey glass as possible. The panels have the same theme and basic
layout but each one has its own variations,
Look for the Diamond H in many pieces; notice the differences and the
similarities; and mostly enjoy these door panels.
Monday, January 30, 2017
Grinding
Glass can do many things. It can break, snap, glisten and glow. When it comes to shaping it and "encouraging" one piece or another to fit into place, I have a large arsenal of tools at my disposal.
Pictured here is my beloved grinding wheel. It's like spinning sandpaper that slowly wears away the glass with a rough surface. The white mess you see is the ground glass "sand" piling up and also water which acts as a lubricant to keep the machinery from overheating. Underneath, I've added a scrap of leather to slide the glass on as I gently rotate it across the face of the rotating wheel. Without that leather, the glass "sand" would happily scratch my pretty Heisey pieces and I'd lose that magnificent lustre in about two minutes flat.
I'm sure you can imagine the mess this sort of machine makes in the rest of my workshop too - spraying water and glass "sand" with abandon. Over the years I've developed a deep, cellular loathe for that mess, and so I built a taped-together "hood" or sorts to cover the workspace without interfering with my view. It might not be perfect or expensive, but it does the job just fine and it has made my life a lot easier to just accept the fact that working with stained glass will always be messy; it's best to let the mess live in one place after all and not stress about it.
That spatter gets everywhere too, and is especially annoying when it gets onto my glasses! Oh the sacrifices we artists must make for our work. But OH! how we are rewarded.

Pictured here is my beloved grinding wheel. It's like spinning sandpaper that slowly wears away the glass with a rough surface. The white mess you see is the ground glass "sand" piling up and also water which acts as a lubricant to keep the machinery from overheating. Underneath, I've added a scrap of leather to slide the glass on as I gently rotate it across the face of the rotating wheel. Without that leather, the glass "sand" would happily scratch my pretty Heisey pieces and I'd lose that magnificent lustre in about two minutes flat.
I'm sure you can imagine the mess this sort of machine makes in the rest of my workshop too - spraying water and glass "sand" with abandon. Over the years I've developed a deep, cellular loathe for that mess, and so I built a taped-together "hood" or sorts to cover the workspace without interfering with my view. It might not be perfect or expensive, but it does the job just fine and it has made my life a lot easier to just accept the fact that working with stained glass will always be messy; it's best to let the mess live in one place after all and not stress about it.
That spatter gets everywhere too, and is especially annoying when it gets onto my glasses! Oh the sacrifices we artists must make for our work. But OH! how we are rewarded.

Sunday, January 15, 2017
A little before and after
By now, I'm getting quite a system in place. Raw materials go on to the board and a basic cartoon/sketch of how I'm hoping everything will come together. I start trimming and cutting and looking for symmetry. Then things start to fall into place, everything changes around, decisions are made, plans are upended, magical little surprises pop up everywhere, and then WHAMMO I get to see how the finished panel is going to really hold together.
It's back breaking. It's frustrating. It's inspiring. It's enchanting.
It's Heisey. What else can I say? I am so lucky to have this opportunity. I think I am the luckiest person around, most days. Just look at it. I can't help myself. Every cut, every bandaid, every burn and every ibuprofen is absolutely worth it when I get to see things like this come together before my very eyes.
It's back breaking. It's frustrating. It's inspiring. It's enchanting.
It's Heisey. What else can I say? I am so lucky to have this opportunity. I think I am the luckiest person around, most days. Just look at it. I can't help myself. Every cut, every bandaid, every burn and every ibuprofen is absolutely worth it when I get to see things like this come together before my very eyes.
BEFORE:
 |
| Dedication panel thumbnail for the bottom half of one of the doors. |
AFTER:
 |
| One of the dedication panels "completed" (not quite, but I can hold it up to the light!) |
Just look at the changes I made! Of course, there's still another panel to finish for the other door. And OH what surprises await!
Wednesday, January 11, 2017
Depth
I just finished working with this monster of a piece; the yellow one. It's was a real pain in the neck, to be honest. The color was perfect, the pattern was delicious, it was an irresistible piece to be sure.
Goodness gracious how was I going to put a thing like that into my lovely work?
Well, of course I found a way. We're friends again and it's very happy in its new home.

BUT LOOK AT THE DEPTH OF IT!
Goodness gracious how was I going to put a thing like that into my lovely work?
Well, of course I found a way. We're friends again and it's very happy in its new home.

Thursday, November 3, 2016
Color Color Color
Heisey is so much more than just "clear" glass plates. I've made a point of trying to incorporate the variety of colors produced by Heisey into my panels. These little splashes of color will shine like rare jewels when the final installation is complete. It's so exciting to think of how they'll dazzle and catch our attention with the sun pouring through them!


It's coming together, piece by piece, and inch by inch. Sometimes I feel overwhelmed at my layout table by the amount of work that's yet to be done; the amount of decision-making and design that's yet to unfold. How can I possibly get all of these gorgeous pieces to fit together properly? How do I showcase each pattern, each color, without ending up with a complicated jigsaw mess?

And then comes a moment when it all just "works". It's magic, to be honest. It's work and it's practice and it's sore muscles and aching joints, and it's pure magic. There's not a shape, an angle or a color in these panels that isn't deliberate. Each organic curve found its way "home" after hours of struggle and wondering and frustration. Each detail is mine, but as a whole, I can see the finished product is going to be so much more than any of the sum of its parts. And that's what makes a project like this so satisfying. To be lost in the work is as frustrating as it is enchanting. To see it become its own creature when finally installed, to see it "living" and adored in its new home; again it's magic. It's a great big spell being cast. It couldn't be more exciting! (or exhausting!)


Looking back at the raw materials, it's certainly a challenge to make sure I have space for the pieces I want to feature. Every time I get a new shipment of glass from the museum, there are new surprises just BEGGING for a place in the window. Adjustments will be made!

It's coming together, piece by piece, and inch by inch. Sometimes I feel overwhelmed at my layout table by the amount of work that's yet to be done; the amount of decision-making and design that's yet to unfold. How can I possibly get all of these gorgeous pieces to fit together properly? How do I showcase each pattern, each color, without ending up with a complicated jigsaw mess?

And then comes a moment when it all just "works". It's magic, to be honest. It's work and it's practice and it's sore muscles and aching joints, and it's pure magic. There's not a shape, an angle or a color in these panels that isn't deliberate. Each organic curve found its way "home" after hours of struggle and wondering and frustration. Each detail is mine, but as a whole, I can see the finished product is going to be so much more than any of the sum of its parts. And that's what makes a project like this so satisfying. To be lost in the work is as frustrating as it is enchanting. To see it become its own creature when finally installed, to see it "living" and adored in its new home; again it's magic. It's a great big spell being cast. It couldn't be more exciting! (or exhausting!)

It's the little things....

This is a broken section of a plate that I picked up when I was in Newark last December. I’ve been saving it for someplace “special” in the panels. Finally last week the piece let me know where to put it! It is going just above my name plate in the lower panel I’m working on now. The piece is about 6 inches by 3.5 inches. This is probably the most spectacular cutting of any piece in the four panels. This is far and away the most intricate and beautiful cutting I’ve seen.
Of course if I were going to use it, I needed to know about it. I had not seen this cutting anywhere and was worried that it might not have been Heisey. Haul out the books, it's research time! Amazingly, I found the cutting in my first reference book from when I first started collecting/researching Heisey. The pattern is called Churchill #890 and dates from 1937 to 1942. The next step was identifying the plate. That took a little more time but I had plenty more clues. Over on the nearly broken off edges is a fan shape. A-ha! Though the upper center shape is not pictured anywhere, the pattern is Queen Ann #1509 (an updated pattern based on the early Empress #1401), made from 1938 to 1957. The giveaway clue turned out to be the very subtle vertical optic thicknesses that go around the plate. I had just been reading about the various “optics” used by Heisey in the October Heisey newsletter. It is a way of adding sparkle/depth/variation to the way light comes through the glass.
There it was – and listed as a feature of this Queen Ann. This must have been a fairly large platter or serving plate.
There are quite a few pieces in these panels that strike me breathless with their grace and beauty.
This piece is at the head of the list.

Thursday, October 20, 2016
Slicing a plate

It sure takes a lot of work to get that sparkle just right, though. This is what it looks like while I'm using a special machine to slice a plate to the exact right dimensions. You see, I just need the starry center of this plate.

And here is the final product. The starry center of the plate, which I needed, is free to find a home in the panels now.

But what about the outer ring? Well, the "leftover" plate will either fill in elsewhere or it will go back to the museum to be melted into marbles or fused into other beautiful ideas and creations!
And now, back to slicing! There is a lot more work to be done!
Tuesday, September 20, 2016
But what about those dedication panels?
They're coming along great, actually. Each dedication panel is really starting to develop its own personality as I continue to find pieces and chunks and portions to add to them. Each portion of this project has brought its challenges, mechanically AND artistically, but I am proud to say that I've been up to the task at each turn.
Each of these lower panels has a center full plate. Then on either side of the plate are the dates of operation for the Heisey company... 1896 and 1957. Below on one of the panels will be my name, and on the other will most likely be "Glass from Heisey Collectors of America" and "Installation by Blake Bros. Glass Co., LLC", or variations on this.
By the way, last week I sent a full box of the leftovers to the museum to use on the new marble project. (I'm a marble collector, too.)
And now, a look at our progress!


Each of these lower panels has a center full plate. Then on either side of the plate are the dates of operation for the Heisey company... 1896 and 1957. Below on one of the panels will be my name, and on the other will most likely be "Glass from Heisey Collectors of America" and "Installation by Blake Bros. Glass Co., LLC", or variations on this.
By the way, last week I sent a full box of the leftovers to the museum to use on the new marble project. (I'm a marble collector, too.)
And now, a look at our progress!


Wednesday, August 31, 2016
A peek at the raw materials!
There are so many different kinds of Heisey. So many shapes, colors, treatments, patterns... it just goes on and on. It's an incredible challenge to try to adapt my skillset to work with this raw material and all of the little nuances that come with it. What a delight, however, it has been.


Treasures, All!
Sunday, August 28, 2016
Oh, this is getting exciting!
I’ve just finished talking with both Jack and Susan. It has been good to be in contact again. How strange it is to admit that I'm running out of pieces to work with! I have requested use some “new” pieces from the museum to help me fill in the gaps with more of the same high-quality patterns that I've grown accustomed to for this project. Of course there remain some left over parts that I could use, but all the really interesting glass is already in place in the panels.
With that in mind, here are my thoughts on what I’d like to add. (taken from the email that I used to make the request!)
I need mostly flat pieces like plates and saucers. These can/should be broken/chipped stuff because the pieces I need will be around 3 to 4 inches by maybe up to 6 or 7 inches after I’ve cut them to size. They are for the fill in spaces. Anything with etched patterns and mold patterns along the lines of Whirlpool, Old Sandwich, Prince of Wales, Rococo, etc. would be great. Any etched patterns, particularly if they are also in the center, like Moongleam, floral motifs or any needle etchings will be useful. All together I could use maybe 12 to 16 pieces – color would be an extra bonus.
The stack of glass to be returned is building up, too. All the scrap parts from the cutting are being saved in containers that I will mail back to the museum for further use. It’s even sorted by color. (When it comes to great ideas, the Heisey Museum runs on them! My leftover bits and pieces are going to be melted into beads and marbles. Nothing is going to go to waste!)
The first two panels are complete and ready to go to their home, but since the installation and various ceremonies are undecided, they will stay here in Colorado a bit longer. The two lower panels are now well underway.
Wednesday, July 20, 2016
A fresh summary:
Stop me if you've heard this before...
These four panels are calling on all the skills and knowledge about stained glass construction that I have learned since I first started working in glass in the 1960’s. In addition, these panels are requiring many new approaches with new solutions. Because the Heisey glass is not flat but actually three dimensional, there is the challenge of fitting the pieces together while maintaining the design and having the entire panel fit within the required depth dimension allowed so that the panels may be sealed between two layers of plate glass for installation in the new doors.One goal for these panels has been to use glass from the Museum that was broken or damaged. Many pieces have chips, cracks, major scratches – all of which turn them into “scrap” glass. For my purposes, a great deal of this glass can be re-purposed through careful cutting and grinding into quite useable pieces for the panels. Often times a third of a plate will clear the imposed depth while the full piece will not, it is too deep to fit. The base of a goblet can become a roundel and slices of a goblet’s bowl and be flat enough if properly trimmed.
The internal strengthening created using zinc calming (caming) as an integral part of the overall design also mitigates the spaces which helps control the fitting of the glass into the allotted depth.
Having completed the upper two panels to the point where they can be put upright for a full visual inspection, two things are immediately apparent. These panels are very sturdy – the internal barring is quite strong and the glass itself (much of it is amazingly thick) adds strength. The second thing is that the high quality of Heisey glass – its sheer clarity and sparkle – makes these panels fantastic. They seem to glow.
Another area of discovery is working out the adjustments to each piece so that the pieces may be soldered together after they have been foiled. Some of the individual pieces require over an hour of special grinding to get the proper fit. In most cases a higher/lower touching allows for a good fit. Occasionally there are larger gaps to bridge. Since the panels are enclosed, some of those gaps can be left open, accenting the three-dimensionality of the panels.
However, all this non-flat surfacing will make the final cleanings of the panels quite an undertaking.
This too, is turning into quite an adventure.
Friday, July 1, 2016

Monday, June 20, 2016
While it's on my mind...
You know, I've been looking through my research library (no really, my collection of books out here is just a few volumes short of requiring a full time librarian these days!) and I've found some of my favorites that talk about the history of Heisey, the patterns, everything. It's been lots of fun looking through them and having so many of the patterns right in front of me to look at and review! Goodness, it has filled my head with memories, too, of growing up with my own mother's collection of beautiful, useful glassware.
I remember my mother had some magnificent Heisey pieces that she used for special occasions, as well as those salt and pepper shakers that were always on the kitchen table. She just loved the beauty and utility of Heisey. I remember specifically she had two marvelous punch bowls, one which I inherited upon her passing and the other one went to my brother John for his family. I'm fairly confident that his punchbowl was Heisey, but I know for sure that my punch bowl is Heisey! It's a cherished jewel in my personal collection and I just never seem to be able to use it enough. Oh well, can't be throwing too many parties, after all, with all of this real work to do!
After my mother introduced me to the Questers organization, my fascination with Heisey started to bloom. It was a pretty slow process, back then, as I had two young children and a drum-tight budget. I was also nursing a fondness for Pueblo pottery, among a few other collections, but the "addiction" to collecting was in my very bones and there was nothing for it but to take my time, learn everything that I could, and wait for the years to continue to present me with more and better opportunities for growing my carefully curated collections. Not unlike the roots of aspen trees that reach out to produce new, healthy stems... one piece of Heisey soon became another which in time became a handsome "grove" of beautiful pieces. Pretty soon, a collector in my position realizes that there's a real treasure being built in the house, and it wasn't long at all before I was being asked to share what I knew about my pieces for my other antique-adoring friends.
My goal has been, and continues to be to have a piece (at least one) of as many patterns as I can. It's not a very smart way to control a collection, but it's a grand adventure, to be sure! Besides, the pieces are wonderful and useful and nary a season goes by when I don't pull out a treasured Heisey piece for use on my dinner table to hold fruit, flowers, or sandwiches for guests. My mother was absolutely right about choosing such a great company for her beloved glassware. It just goes to show, if I may be so bold, that she did a great job instilling me with her fondness for all things beautiful and practical (after which I threw in plenty of my own "impractical" twists for good measure.)
I remember my mother had some magnificent Heisey pieces that she used for special occasions, as well as those salt and pepper shakers that were always on the kitchen table. She just loved the beauty and utility of Heisey. I remember specifically she had two marvelous punch bowls, one which I inherited upon her passing and the other one went to my brother John for his family. I'm fairly confident that his punchbowl was Heisey, but I know for sure that my punch bowl is Heisey! It's a cherished jewel in my personal collection and I just never seem to be able to use it enough. Oh well, can't be throwing too many parties, after all, with all of this real work to do!
After my mother introduced me to the Questers organization, my fascination with Heisey started to bloom. It was a pretty slow process, back then, as I had two young children and a drum-tight budget. I was also nursing a fondness for Pueblo pottery, among a few other collections, but the "addiction" to collecting was in my very bones and there was nothing for it but to take my time, learn everything that I could, and wait for the years to continue to present me with more and better opportunities for growing my carefully curated collections. Not unlike the roots of aspen trees that reach out to produce new, healthy stems... one piece of Heisey soon became another which in time became a handsome "grove" of beautiful pieces. Pretty soon, a collector in my position realizes that there's a real treasure being built in the house, and it wasn't long at all before I was being asked to share what I knew about my pieces for my other antique-adoring friends.
My goal has been, and continues to be to have a piece (at least one) of as many patterns as I can. It's not a very smart way to control a collection, but it's a grand adventure, to be sure! Besides, the pieces are wonderful and useful and nary a season goes by when I don't pull out a treasured Heisey piece for use on my dinner table to hold fruit, flowers, or sandwiches for guests. My mother was absolutely right about choosing such a great company for her beloved glassware. It just goes to show, if I may be so bold, that she did a great job instilling me with her fondness for all things beautiful and practical (after which I threw in plenty of my own "impractical" twists for good measure.)
Saturday, June 4, 2016
Well it's been a few weeks! What's up?
Mary and Sid donated two beautiful Plantation plates for the panels! So grateful for this donation, as it turns out that they'll add some more wonderful diversity to the patterns being featured in these panels.
By now one of the upper panels has been completed! As much as I'd love to bring it to the annual meeting, the photographs I've sent to Michael must suffice. I'm far too busy to attend the meeting this year but I hope my Heisey team will remember that I'll be busy on this project... working hard on these panels which I've grown to love so much. It won't be the same, certainly, but I'll be having plenty of Heisey fun out here when the meeting is taking place.
The layout/planning stage is well underway for the upper panel that's going to contain the Plantation plates. As I continue to assemble, I've found the perfect spot for at least one of the Oak Leaf coasters, too! Last month I found a single Greek Key coaster-sized plate that I'm keen to use in this project, and the Oak Leaf coaster plate matches the size exactly. I'll be able to use them both, then, and maintain the symmetry we've already established within the panels! It's been a really exciting discovery, I do love it when little finds like these suddenly wave at me and offer me such pretty solutions. I have plenty of opportunities going forward too, to work on other feature-able patterns, so that's fantastic!


By now one of the upper panels has been completed! As much as I'd love to bring it to the annual meeting, the photographs I've sent to Michael must suffice. I'm far too busy to attend the meeting this year but I hope my Heisey team will remember that I'll be busy on this project... working hard on these panels which I've grown to love so much. It won't be the same, certainly, but I'll be having plenty of Heisey fun out here when the meeting is taking place.
The layout/planning stage is well underway for the upper panel that's going to contain the Plantation plates. As I continue to assemble, I've found the perfect spot for at least one of the Oak Leaf coasters, too! Last month I found a single Greek Key coaster-sized plate that I'm keen to use in this project, and the Oak Leaf coaster plate matches the size exactly. I'll be able to use them both, then, and maintain the symmetry we've already established within the panels! It's been a really exciting discovery, I do love it when little finds like these suddenly wave at me and offer me such pretty solutions. I have plenty of opportunities going forward too, to work on other feature-able patterns, so that's fantastic!


Thursday, May 26, 2016
Interview Time! Just a quick question:
Why Heisey? What got you hooked on collecting it?
Mother had a few pieces of Heisey but I remember distinctly her overall love of cut glass. The Heisey pieces in her collection which I remember most are the Greek Key jelly bowl and the salt and pepper shakers. Actually, I only found out that the salt and pepper shakers I'd loved for so long were Heisey after I had inherited Mother's entire glass collection. She probably had at least ten pieces that came to me at that point, and those pieces really galvanized my fondness. My mother was really into cut glass later in life but she had always liked to use her glassware for serving and display. She simply thought the glass was beautiful, and therefore I naturally thought so too. When Mother's love of glassware really started to become a genuine collection, she was a member of the local Questers chapter and so was I.Mother introduced me to the Questers, an organization of brilliant people who are dedicated to restoration, preservation, collection and simple adoration of all things antique. (My daughter calls it "antique collectors anonymous" but it's so much more than that!) Together, Mother and I enjoyed the club meetings and activities and we learned a great deal about all of our collections; not least of which being Mother's cut glass and her precious Heisey. Maybe being a part of Questers let me discover my passion, maybe it just fed the "addiction". The fancy grew slowly at first. But as anyone who loves Heisey knows, the more one looks, feels, uses, studies the glass the more wonderful it becomes.
Even as I work with the glass on this project, the more I truly appreciate it. Every piece I work with for this project has a little something to show me, to teach me. Everything sparkles and invites adoration. It's not hard to love Heisey. Obviously. Of all of the things in the world to be "addicted" to... I could do a whole lot worse!
Saturday, May 7, 2016
Details Details Details
They say "The devil is in the details."
And in this case, that couldn't be more true. Except, instead of "devil", let's say "beauty". And instead of talking about it, let's just look at some pictures of how far we have come. Can you see some of your own favorite patterns appearing in the final product yet?


And in this case, that couldn't be more true. Except, instead of "devil", let's say "beauty". And instead of talking about it, let's just look at some pictures of how far we have come. Can you see some of your own favorite patterns appearing in the final product yet?


It's just a scuff, but it came with the glass. It's perfectly imperfect.

That copper color is the un-soldered foil. The silver blobs are solder melted through from above (or accidentally splashed on the glass (top center). These between-areas are going to all be smooth silver solder when I'm done with them!
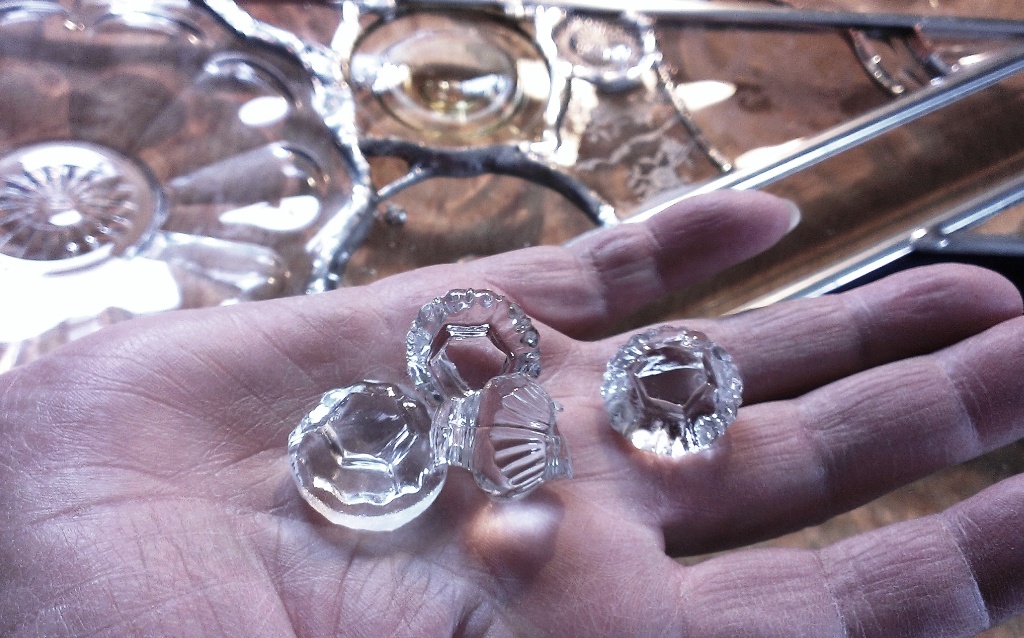
Better than a handful of diamonds, these are nuggets from stemware!

This is where those nuggets come from.
Before and after, if you will.

Can you see the pattern in the cup I'm holding and where it correlates to the same pattern in the piece I'm indicating? Need a hint? Find the ribbon.
Friday, May 6, 2016
Interview time!
Tell us about the tools you are using for this project. What does the process look like for a project like this?
There are several tools being used for this project, most are quite familiar to even the newest members of the stained glass club. The glass cutters I use are about as basic as could be, and many date back to my own earliest days in the medium. Many are older than my own, grown children! The glass cutter is a scratching device that scores a single line into the glass, making a weakness in the glass along which I hope it will break. I say "hope" because the glass often has its own designs on how to break. Lots of practice can help dial in the accuracy of these early steps, as can my array of various pliers which are designed to control the break. If the cut/scoring is done properly, and a confident technique is applied to the break, I am rewarded with a clean SNAP and nice smooth edges to work with in my pieces. If not - well, things get messy pretty quickly and then other tools come in to play for the "recovery" phases.
There are multiple pliers in my arsenal which exist explicitly for "grozing" the glass edges... that is to nip away at the jagged edges that didn't cooperate and to pull off as much of the razor sharp shard as possible. Once the glass is manually cut and grozed to size, it's time to use the electric grinder to grind away any final errors in my desired shape. Even the smallest burr can mis-align a piece and every piece needs to nest perfectly next to its neighbor if the window is to come to an exact, pre-determined measurement. Sometimes my windows and projects CAN grow, and it's fun to allow the glass space to do its own thing. But in this case, the finished panels must fit into the existing door spaces. So no surprises are allowed!
When it comes to building a window out of dishes, bowls, cups and saucers, a whole new series of cutting complications arises. Glass likes to break along weak spots, or lines that are thinner than the rest of the glass. So a piece of glass with a pattern already scored or molded into it is a completely different creature from what I normally work with. It is for this purpose I bring to task my newest tool, a ring saw, which can grind a thin gap down a solid plate (for instance) to separate it into two or more pieces without the danger of having to snap it and hoping it goes the way I want. The ring saw allows me to carve into a three dimensional bowl or dish much more easily than any of the other tools I could use. It's been a dream come true for this project!
Next, when the pieces are all cut to size and fitting perfectly, it's time for foiling or calming. Foiling is the process of applying a thin adhesive copper tape to the edges of each piece so that they can stick together. If the pieces are large (like the center "H" on each panel) I can use calming (pronounced "Cay-Ming" to rhyme with framing). Calming is an H-shaped strip of metal that is used to hold glass in place in the finished window. It's very hard to use with small details, but for the larger pieces it does the job perfectly, as it has done for centuries of glass workers before me.
After the foiling, the pieces are still loose, so it's time to "glue" them together. A quilter uses needle and thread. A stained-glass-window maker uses solder (pronounced "sodder") This is a simple process of applying an acid to the copper foil around each piece of glass (to clean it and make the copper accept the solder) and then melting the lead solder into place. It's the same process used for fusing electrical components together, just on a much bigger scale!
When every millimeter of my design is foiled and soldered, and every joint and connection has been adequately sealed and checked for good adhesion, it's time for my "favorite" part: Cleaning. Cleaning each window is actually quite a chore, but it is critical to the success of the final product and making sure it's done right. This is not the time to get lazy!
Cleaning each of my windows takes some pretty interesting problem solving, and for a long time I've simply carried the window to the bathtub for a good scrubbing. Soap and water works just fine, but some vinegar solutions or even good old formula 409 can get the grease off a little faster. For tough grease and marker lines, there's nothing like my beloved BonAmi! (I have not been paid to make these claims, FYI.)
This is a great time for quality control and to run my fingers over the entire project to make sure that nothing's loose and there are no missing pieces or forgotten lengths of copper foil to be attended to.
Once cleaned, it's time for delivery and installation and I have to say "goodbye" to my newest creation. It's often hard to leave a piece I've spent so much time on, but it's always a pleasure to see the finished product in its final home where it belongs. Glass doesn't work without light shining through it. And as pretty as my work is on my worktable (or in the bathtub!) it's always so much prettier where it belongs.
My other tools include what you'd expect of any artists' table, I suppose, with rulers and straight edges, and paper towels and cleaning supplies and markers and pencils and paper of all sizes. My layout tables are nothing more than re-purposed doors themselves. My favorite tools are my secret weapons: dental tools. Those are perfect for getting into the fiddly little corners and edges of glass nested TOO perfectly together, and they come in so many useful shapes and sizes. I don't know where I'd be without them! Popsicle sticks are indispensable too, when it comes to laying out glass (or in this case dishes) with different thicknesses and depths. Popsicle sticks, dental tools, pushpins and about ten thousand other makeshift solutions find their home in my workshop. Glass isn't demanding beyond a little respect and a little education. Heisey, of course, demands its own reverence, but it's still the same stuff I've always worked with before. Like an old friend in a shiny new outfit.
Each design has its own story to tell. Each piece of glass is a tiny little adventure.
With these panels? The adventure is blooming before my very eyes and I couldn't be more excited to be a part of this engaging, inspiring project.
Subscribe to:
Posts (Atom)